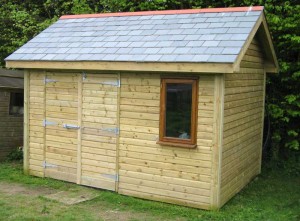
My wife and I bought our home with an attached carport. Sure enough, a few years after we moved in, we had so much stuff sitting in there that we couldn’t even fit a little bit of our car under the roof. I won’t lie, it was an eyesore, and we were feeling a bit of the hairy eyeball from some of the neighbors.
We don’t have a big yard, so we wanted to attach a storage shed to the back of the carport, which had a wood-frame rear wall with siding. We wanted to build the shed frame out from the back, and then cut a door in the rear wall.
We thought with all the special work required, that we’d need custom plans from an architect, but after making a few calls, we realized that was way beyond our budget, so we started looking for DIY plans that maybe we could modify to meet our needs.
 A lot of our searching turned up plans and stores selling pre-built, metal carports, but finally, we found a great set of 12×16 shed plans, sized to match our carport, with styling options we could adapt to fit in with our homes exterior design.
I’m pretty handy and so framing the shed and attaching it to the back of the carport wasn’t too big of a deal. If you’ve ever worked on a porch, deck or patio for your house, then you’ll have no trouble building a shed. The original contractor had done a pretty lousy job with the siding, and one of the posts had a little water damage, but it was not too bad, and so we applied some wood rot treatment, and made sure we had a nice tight seal between the carport roof and the shed, with adequate drainage to prevent additional moisture from collecting.
The big new thing I tackled with this project was cutting the door, here’s the most important things I learned, in case you’re considering a similar design:
- Figure out where your wiring, pipes and ducts are before you cut – we didn’t have any plumbing or duct-work, but we did have a light-switch, crazy given the water damage, but we got an electrician out to safely cap the wire and move the carport light onto another circuit. I hate messing with electricity, and if you find wiring, plumbing or duct-work in the way of your door, it’s probably time to call a contractor.
- Make room for the door-frame – seems obvious, right? But make sure you’ve got enough room for the structural framing.
- Don’t forget the floor – not such a big deal for us, since it was just a storage shed, but we did add a splashguard to the bottom of the door to prevent rainwater from flowing under
We’re super happy with our new shed, and I managed to acquire two new power tools along the way (score!). Let me know if you’re looking to attach a shed to your carport, and I’ll try to answer your questions. Otherwise, good luck and happy building!
Building a Shed with Modular Design
 Filed Under :
best shed design,
Building a Shed,
built a shed,
Storage shed,
wooden shed’s
by Nicky Foto
Filed Under :
best shed design,
Building a Shed,
built a shed,
Storage shed,
wooden shed’s
by Nicky Foto 10:16 PM
When my wife and I (okay, it was just me, but I had her moral support) started looking for a storage shed, we didn’t really know anything about them, we just wanted a decent-looking structure that would free up some space in our carport.
 I made the rounds of our local home-improvement megastores, but I found the selection was kind of limited at the Home Depot and Lowe’s in my neighborhood, and they were all a bit smaller than what I had in mind.
Returning home, defeated but undaunted, I googled around and found a “shed superstore” with every type of garage, gazebo, pole and wood barn you can imagine… and a few sheds too. But they were a couple hours out of town, and most of the sheds I saw on their site were too big, I was starting to feel like Goldilocks, where would I find the shed that was just right for me?
Then, on the brink of despair, a search result caught my eye, modular sheds, long story short, this proved to be the answer to our shed search, and if you’re thinking about a 12×16 shed, then you should definitely consider the modular option.
What is modular design?
Any construction project that relies on modular design means that the structure can be broken down into component parts or sections, which have some degree of inter-change-ability and extensibility. You can swap one section out for another, say a door, window or roof, or you can add sections, usually to increase the size of the shed footprint (length x width). I have seen a few two-story sheds online, so you can go for height, just be sure you know what your residential zoning requirements are, and watch out for nearby power lines.I’d never built a shed before, but I’m handy enough, and I’ve accumulated a pretty extensive set of tools in my workroom (which may or may not have gotten a few upgrades during the course of this project “strictly necessary” of course, but after reading a bunch of online how-to articles, and watching some videos, I felt like this was do-able, and would make a nice project for the fall.
I found a set of plans online that had flexible layout options to give us the footprint we wanted (L-shaped) — Shoot me an email if you want to know which ones and I’ll send you the link. Put in a call to my local lumberyard, and got psyched for a weekend (or four of shed raising!
Well then Murphy’s law, we then proceeded to have the wettest fall on record for the past eight years. I had my plans, and the materials were on order, but weekend after weekend was lost to heavy rains, and we had to postpone delivery 6 times. Finally though, we got a break, and the flatbed rolled up with my lumber.
When building your shed, expect the unexpected
 I won’t lie and say things went perfectly smoothly from there on out. I got off to a rocky start because I hadn’t done enough work to plan out my foundation. Water is a wooden shed’s ultimate nemesis, and with all the rain, I had planned to pour out a slab foundation, but the rain had made that impossible, and so I shifted to a floating, or on-grade foundation.
Well a good thing to know if you’re putting in a floating foundation, is that you want your floor joists supported by solid concrete blocks, and blockhead that I am, guess what kind of blocks I had? Yep, good old hollow cinder blocks. So returning those and getting the solid blocks took out half of my building time the first weekend.
We hit a few more snags along the way, I was excited to try putting in a sky-light, but that will have to wait for my next shed. Thankfully, I live in a warm climate, and so we only had our first cold snap before my final weekend “sprint” to put on the finishing touches. My wife is happy with the way it looks, and we’ve got a nice, clean carport again.
Ready to build your own shed?
If a storage shed is your next DIY project, start with reliable, proven shed building plans. Just like me, you can find the perfect plans online, without paying out big bucks to an architect for a custom design. We got tired of all the lousy and confusing information out there on the internet, and so we put this website together to help you find your best shed design or made-to-assemble kit.Building a shed is fun, and I love looking out my kitchen window each morning as the sun hits our backyard and thinking “Yep, I built that,” but it might not be for you. There are plenty of “off the shelf” solutions for a storage shed, but just be sure to look around and/or get in touch with any of us here, I’d hate for you to make an impulsive decision that ends up costing you big, and maybe even worse, reminds you every time you visit your back yard.
Building a shed is easier than building a house, but that does not mean you can go into building a shed without shed plans. With proper plans, you will be able to build a shed that is sturdy and strong, rather than one that seems to be thrown together without any planning. The simplest form of shed is one that has four walls, a floor and a roof. Rather than get into building a shed that has two floors, or more than one room, you should build an easy one-room shed.
The first decision you need to make is if you want the shed to rest directly on the ground, or if you want it raised off the ground. If you choose to have it directly on the ground, then you need to make sure you have level ground. If you do not have level ground, then installing nine posts that go into the ground would be the best option. Make sure each post is firmly in the ground and are level with each other above the ground.
 |
| Proper Shed Plans |
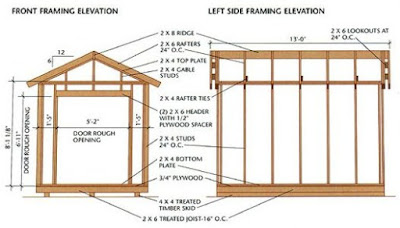
A good sized shed is one that is 12 feet by 8 feet. Each side will have three posts. The 12-foot walls will have three posts, spaced six feet apart. The eight-foot wall will have the posts spaced four feet across.
In your shed plans, you will need to have floor joints. These will give your floor much needed support and ensure you do not break through when walking in your shed. Each floor joint, which is a 2×4 that runs the full length from one 12-foot wall to another and is parallel with the eight-foot walls, should be one-foot four inches spaced apart.
For your walls, the back 12-foot wall should be seven-feet, three inches high, and each board within the wall should be spaced one-foot, four inches apart. The front 12-foot wall should be seven-feet, nine inches high. This is because you want it to slope back allowing for rain and snow to slide off. The studs are the same distance apart as the back wall, but make sure you leave space for a door.
The side walls will be a bit different. The first space between the first stud and second stud should be 12 ½ inches apart. With the rest of the studs being one foot, four inches apart. As well, the back stud should be seven feet, three inches, and each stud after that should be one inch higher to accommodate for the sloped roof.
Lastly, the roof rafters should run parallel to the eight-foot walls. Each roof rafter should be ten-feet long. The spacing of the roof rafters will match the spacing of the floor rafters.
When you have proper shed plans, you make things much easier on yourself. You will be able to plan what you want for the shed, and be able to build it easily and efficiently, with few errors.
 Tags :
Building a Shed,
Proper Shed Plans,
Shed Plans
Tags :
Building a Shed,
Proper Shed Plans,
Shed Plans


You would think that building a shed is quite difficult. Surprisingly, no. All it takes are the right tools, the right shed plans, a little bit of patience and work. Building a shed can be really fun when you have the right tools and equipments. And the best part is that you don’t have to spend as much as you would if you had to hire someone to build the shed for you. In this article, we’ll be looking at five tips that can help make your building a shed easier and faster. These include:
Choose an Appropriate Site for the Shed
The one thing many people typically find difficult the first time is where to locate the shed. Having an idea of where to locate the shed is the first step you need to take when thinking of building a shed. If you are unsure of where to set up the shed, avoid setting up the shed at the bottom of a hill as water is likely to pool around it, resulting in wood rot and mildew growing on the items in the shed.Choose the Appropriate Distance
While you can build a shed on your property, it is important for the shed to be built according to building department’s zoning laws and regulations. It is generally recommended that all sheds should be built at least 15 feet away from the rear property line.Do Not Build it too Far Either
The shed shouldn’t be so far from the main building. Building a shed in the farthest corner of the property or land can have a lot of disadvantages. For instance, it is not easy to keep going back and forth between the shed and the main building if the shed is too far away. Also, people are less likely to return the tools to the shed if the building is too far away.Avoid Shady Areas too
While you might think that building a shed in a shady area might keep it cool, it is more likely that the shade will result in a humid shed with a lot of moisture trapped in it. This will in turn, result in the equipments rotting, rusting or getting mould on them. If you want to build the shed on a slope, ensure that the door is on the higher side. This way, access is easier and there’s more room on the inside.
Tags :
Build Shed,
Building a Shed


Information You Can Build a Beautiful Shed.
If you wish to make use of extra space on yard for storage or a work area, a DIY learn to shed will surely provide you exactly which you ne...